
When you need to add required input field to the product page of your WooCommerce shop and this field needs to be stored in order as an attribute and sent to the customer in confirmation email, you’ll need to add custom code to your theme’s functions.php file. Here is the step by step tutorial process how to add woocommerce and code:
Step 1 – Customize Product Data Page
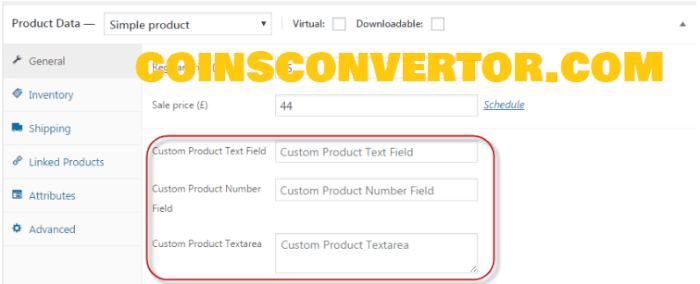
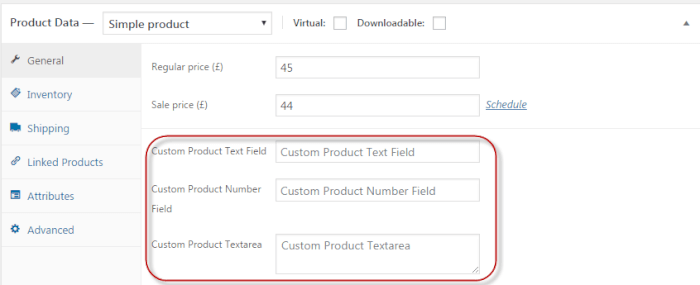
- As in the screenshot below, I will show you how to edit the functions.php file (found in the theme folder) to add custom fields to the Product Data page.
Step 2 – Add Hooks in WooCommerce
-
The first step is to hook to woocommerce_product_options_general_product_data. The function linked to this hook is responsible for displaying the new fields.
A second hook, woocommerce_process_product_meta, will save the custom field values.
Both these actions are carried out in the following code:

Step 3 ( How to Add WooCommerce tutorial) – Add Custom Product Fields
To add the custom fields, I will use the default WooCommerce functions, including:
- woocommerce_wp_text_input
Package: WooCommerce\Admin\Functions
Located at: includes/admin/wc-meta-box-functions.php
- woocommerce_wp_textarea_input
Package: WooCommerce\Admin\Functions
Located at includes/admin/wc-meta-box-functions.php

Step 3.1: Include Field Structure
Note: the use of desc_tip to display those nice little bubbles to the right of the field instead of displaying the default field description. This attribute works for every field type.
// Custom Product Text Field
woocommerce_wp_text_input(
array(
‘id’ => ‘_custom_product_text_field’,
‘label’ => __( ‘My Text Field’, ‘woocommerce’ ),
‘placeholder’ => ‘Custom Product Text Field’,
‘desc_tip’ => ‘true’
)
);
The default value of the step is 1, with the min set to zero. Basically, this means that I expect a positive value here (at least greater than zero).
// Custom Product Number Field
woocommerce_wp_text_input(
array(
‘id’ => ‘_custom_product_number_field’,
‘placeholder’ => ‘Custom Product Number Field’,
‘label’ => __(‘Custom Product Number Field’, ‘woocommerce’),
‘type’ => ‘number’,
‘custom_attributes’ => array(
‘step’ => ‘any’,
‘min’ => ‘0’
)
)
);
Use the following to create a textarea.
// Custom Product Textarea Field
woocommerce_wp_textarea_input(
array(
‘id’ => ‘_custom_product_textarea’,
‘placeholder’ => ‘Custom Product Textarea’,
‘label’ => __(‘Custom Product Textarea’, ‘woocommerce’)
)
);
Use the following code for custom input fields, you must paste this code in functions.php file located in the theme folder.
// Display Fields
add_action(‘woocommerce_product_options_general_product_data’, ‘woocommerce_product_custom_fields’);
// Save Fields
add_action(‘woocommerce_process_product_meta’, ‘woocommerce_product_custom_fields_save’);
function woocommerce_product_custom_fields()
{
global $woocommerce, $post;
echo ‘<div class=”product_custom_field”>’;
// Custom Product Text Field
woocommerce_wp_text_input(
array(
‘id’ => ‘_custom_product_text_field’,
‘placeholder’ => ‘Custom Product Text Field’,
‘label’ => __(‘Custom Product Text Field’, ‘woocommerce’),
‘desc_tip’ => ‘true’
)
);
//Custom Product Number Field
woocommerce_wp_text_input(
array(
‘id’ => ‘_custom_product_number_field’,
‘placeholder’ => ‘Custom Product Number Field’,
‘label’ => __(‘Custom Product Number Field’, ‘woocommerce’),
‘type’ => ‘number’,
‘custom_attributes’ => array(
‘step’ => ‘any’,
‘min’ => ‘0’
)
)
);
//Custom Product Textarea
woocommerce_wp_textarea_input(
array(
‘id’ => ‘_custom_product_textarea’,
‘placeholder’ => ‘Custom Product Textarea’,
‘label’ => __(‘Custom Product Textarea’, ‘woocommerce’)
)
);
echo ‘</div>’;
}
Step 3.2: Save Data in the Database
Once you have created the custom product fields, another function is required to save the values for the update or publish button.
I will create a function woocommerce_product_custom_fields_save. This function is hooked to woocommerce_process_product_meta. It first checks whether the field is empty or filled. If not, a post meta is created using update_post_meta(). I used esc_attr() and esc_html() to secure the data.
Here is the code for saving the value of all the fields:
function woocommerce_product_custom_fields_save($post_id)
{
// Custom Product Text Field
$woocommerce_custom_product_text_field = $_POST[‘_custom_product_text_field’];
if (!empty($woocommerce_custom_product_text_field))
update_post_meta($post_id, ‘_custom_product_text_field’, esc_attr($woocommerce_custom_product_text_field));
// Custom Product Number Field
$woocommerce_custom_product_number_field = $_POST[‘_custom_product_number_field’];
if (!empty($woocommerce_custom_product_number_field))
update_post_meta($post_id, ‘_custom_product_number_field’, esc_attr($woocommerce_custom_product_number_field));
// Custom Product Textarea Field
$woocommerce_custom_procut_textarea = $_POST[‘_custom_product_textarea’];
if (!empty($woocommerce_custom_procut_textarea))
update_post_meta($post_id, ‘_custom_product_textarea’, esc_html($woocommerce_custom_procut_textarea));
}
Thats all, we showed how to Add WooCommerce Custom Field to a Product page. Source: Cloudways
See at more tutorial:
Your content is always so informative and well-structured. This post, in particular, was a great read, and I learned a lot from it. Thanks for sharing your knowledge!